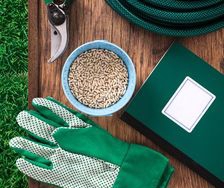
Rusty Shovel Spade

Sharpening garden tools is important, but often overlooked. Tools go blunt with normal use; they also get nicks and wear and tear from stones and rocks.

Sharp tools are safer and much nicer to use than blunt ones. If you look after them, they’ll last much longer and save you cash over the long run.


Asking around the team at Yates, it turns out many of us have inherited tools from parents and grandparents. One of our crew is using an old spade he was given by his grandfather that turned out to be over 120 years old! If you’ve inherited an old tool from somebody important to you, it’s especially satisfying to get it back into peak condition and use it. Then one day, it can be your turn to pass it on. Added to that, vintage tools can be gorgeous, high-quality objects in their own right. There’s some truth in the saying “they don’t build ‘em like they used to”.

Here are our how-to guides to maintain and sharpen different types of garden tools: we’ll focus on secateurs and loppers, digging tools and mower blades.

Secateurs and Loppers

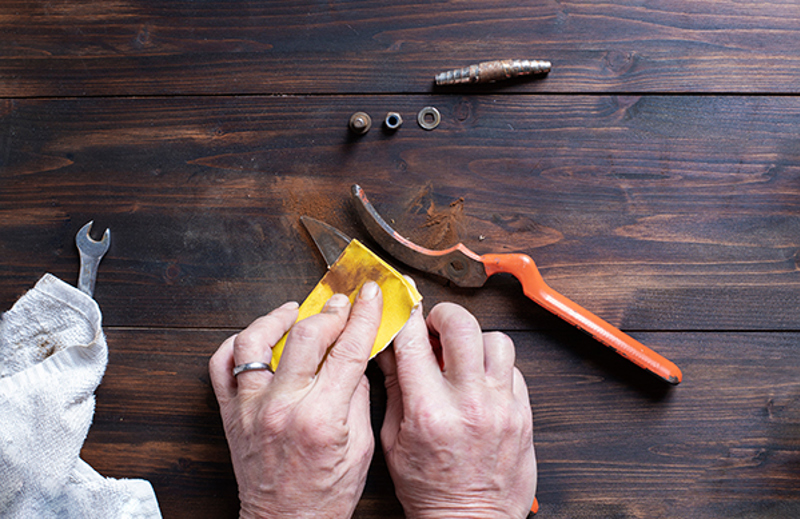
To sharpen secateurs and loppers, follow these steps:

  1. Get together the tools: You’ll need a flat file or a whetstone (sharpening stone), multi-purpose spray lubricant (e.g., CRC 5-56 or WD-40), fine-grit sandpaper, a cleaning cloth, and safety gloves/work gloves. Always wear gloves and be extra-cautious while handling sharp tools.
  2. Clean the tool: First remove any dirt, sap, or debris from the blades. You can use a cloth or a brush to clean the cutting edges.
  3. Identify the correct side to sharpen: Secateur and lopper blades have flat inside surfaces for the blades to slide and slice against each other. Never sharpen the flat sides, or you’ll ruin the tool: you only sharpen the angled bevel on the other side of the blade.
  4. Check the sharpening angle: Most secateurs only have one cutting blade, the opposite blade usually doesn’t have a sharpened edge. The thin angled profile right on the cutting edge is called a ‘bevel’. Look closely at the bevelled edge to see the angle it was originally sharpened at. It’s important to try to duplicate and maintain that angle while you sharpen.
  5. Secure the tool: Use a vice or clamp to secure the secateurs, opened up, in a stable position. Make sure the cutting blade is facing upwards and accessible for sharpening.
  6. If using a flat file: Using moderate pressure, hold the file against the bevelled edge at the correct angle and move it along the blade in smooth, even strokes. If the blade has a curved profile, make your strokes follow the arc of the blade at the same time as maintaining a consistent angle on the bevel throughout the stroke. Start at the base of the blade and move towards the tip. Always file in one direction, away from your body. Repeat for 10-15 strokes. Periodically test the sharpness of the blade by carefully running your finger lightly across the edge. Be careful not to cut yourself. Repeat until the edge feels sharper.
  7. If using a whetstone: It’s usually easier to disassemble secateurs for whetstone sharpening. Apply a few drops of lubricating oil on the stone and run the bevel across it in a sweeping arc, maintaining the correct angle. Start at the base of the blade and move towards the tip. Repeat for 10-15 strokes. Periodically test the sharpness of the blade by carefully running your finger lightly across the edge. Be cautious not to cut yourself. Repeat until the edge feels sharper.
  8. Remove burrs: After sharpening, run the bevel across fine-grit sandpaper laid on a flat surface, to smooth out any imperfections. This step ensures a clean razor cut.
  9. Clean and lubricate: Once you're satisfied with the sharpness, wipe the blades clean with a cloth to remove any metal filings or debris. Reassemble the tool if needed. Apply a small amount of spray lubricant to the centre pivot bolt and spring, then spray a light coat onto the blades to prevent rust.
  10. Test the performance: Before putting the secateurs away, test the sharpness by cutting a small branch or stem. Make sure the blades cut cleanly, without crushing or tearing the branch.

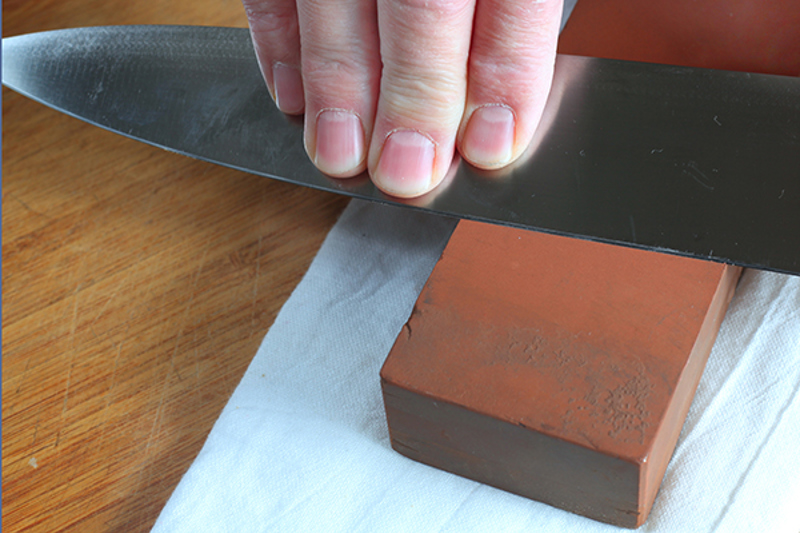
A whetstone (also known as a sharpening stone) is an excellent method to sharpen a wide variety of blades, like secateurs, scissors, knives and chisels.

The real advantage of having a whetstone is being able to sharpen all your kitchen knives. Even if you aren’t the household chef, maintaining sharp knives earns you lots of brownie points! We won’t cover how to sharpen knives in this article, but we wanted to point out a whetstone can be a very versatile tool to have.

Sharpening with a whetstone does require practice and patience, but it makes a really good job. It's crucial to maintain a consistent angle, use appropriate pressure, and periodically test the blade's sharpness to get best results.

Digging Tools

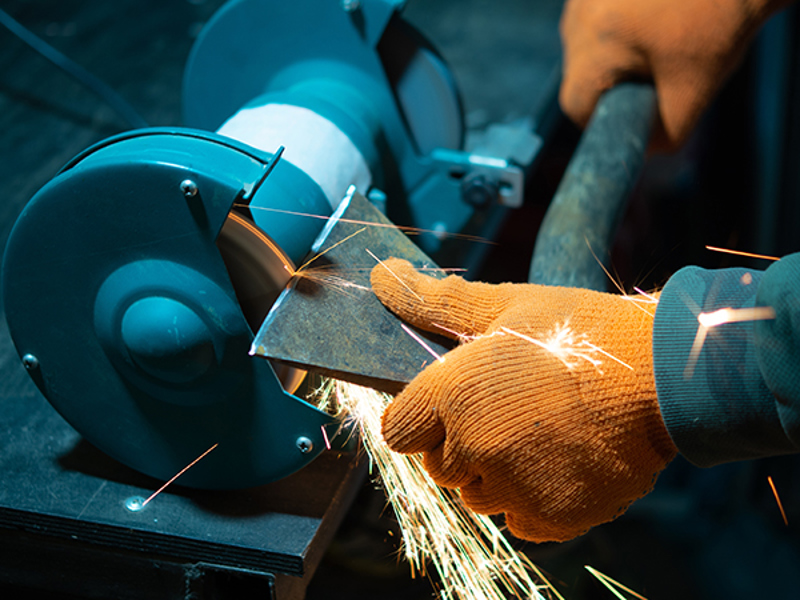
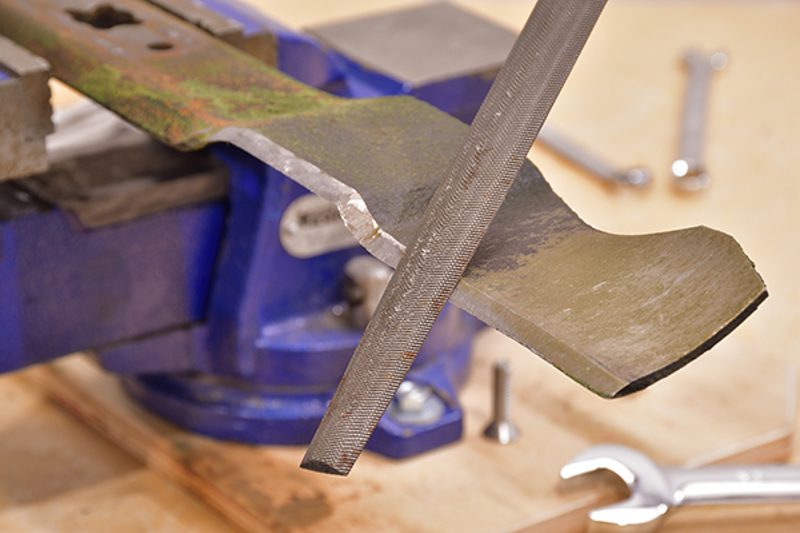
Sharpening a spade or shovel can improve its digging performance and makes it noticeably nicer to use. Here's a step-by-step guide on how to sharpen a digging tool (this technique also works well for hoes, mattocks, slashers and axes):

  1. Get together the tools: You'll need a flat metal file (or a bench grinder), a workbench or sturdy surface, safety eyewear, gloves, multi-purpose spray lubricant (e.g., CRC 5-56 or WD-40), and a wire brush or steel wool. You can use an angle grinder but be extra-careful, as it can aggressively remove metal from the tool. If using any type of powered grinder, make certain you know how to use it safely: grinders can cause serious injury. A file may be slower, but it’s safer and delivers a good result.
  2. Safety precautions: Put on your safety eyewear and gloves to protect yourself from any flicked-up metal debris or sharp edges.
  3. Clean the tool: Use a wire brush or steel wool to remove grime and surface rust from the shovel blade. This makes it easier to see any nicks or imperfections that need to be removed.
  4. Inspect the blade edge: Examine the blade for any nicks, dents or dull edges. You can remedy these during the first part of the sharpening process.
  5. Smooth out nicks or damaged edges: If you find any significant nicks or dents in the shovel blade, use a metal file (or grinder) to smooth them out. Hold the shovel securely against a workbench or another sturdy surface. Start by using broad, sweeping strokes along the edge of the blade, keeping a close eye on the damaged areas until they’ve disappeared. Be careful not to remove too much metal or alter the shape of the blade.
  6. Sharpen the edge: Hold the tool securely against a workbench or another sturdy surface. For larger tools, you may need to secure them in a vice. Using your file (or grinder), work along the edge of the shovel blade, applying light pressure and maintaining a consistent angle. The angle should match the existing bevel as closely as you can. Work from the base of the blade towards the tip, following the original bevel. Always file in one direction only, away from your body.
  7. Test sharpness: Test the sharpness of the blade by carefully running your finger lightly across the edge. Be careful not to cut yourself. If it feels sharp and smooth, you’re all done. If not, repeat until the edge feels sharper.
  8. Remove burrs: When you're satisfied with the sharpness, run a folded piece of fine-grit sandpaper (or a whetstone) along the blade, to refine the cutting edge for a nice finish.
  9. Clean and protect: When you've finished sharpening, clean off any metal shavings or debris from the tool blade. You can use a cloth or brush to wipe it down. To prevent rust, spray a light coat of multi-purpose spray lubricant over the entire blade.

Remember to take your time and work carefully. Always prioritise your safety and use caution when handling sharp tools and/or grinders.

Wooden Handles

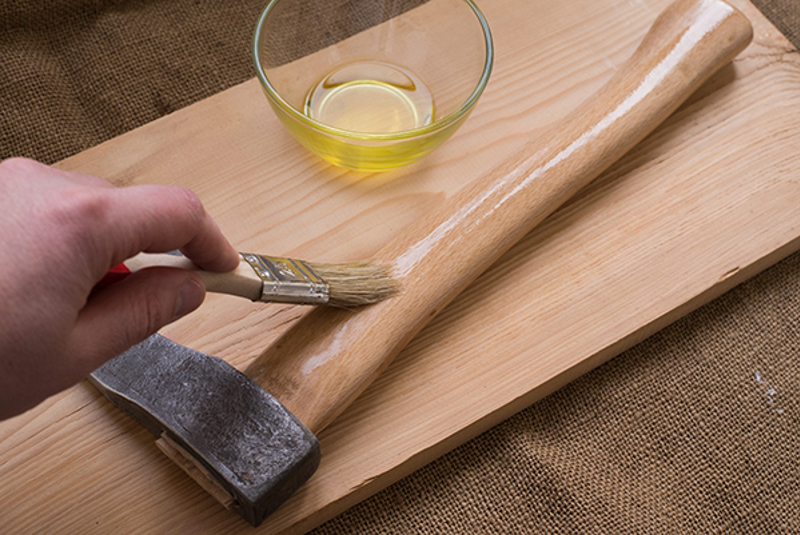
Maintaining the handles on your tools with sandpaper and oil makes them much more comfortable and easier on your hands, while preventing splinters or cracking. Here's how to do it:

  1. Gather the materials: sandpaper (medium to fine grit), linseed oil or boiled linseed oil, a clean cloth or rag, and optionally, disposable gloves.
  2. Start by cleaning the shovel handle to remove any dirt, dust, or debris. Use a damp cloth or sponge to wipe it down.
  3. Once the handle is clean and dry, begin sanding it with the sandpaper. Use medium to fine grit sandpaper to smooth out any rough areas or splinters on the handle. Sand lengthways, in the direction of the grain.
  4. Keep sanding until the surface of the handle feels smooth and even.
  5. Wipe away any sanding dust with a clean cloth or rag.
  6. Apply a small amount of linseed oil (or boiled linseed oil) to the cloth or rag. Linseed oil helps protect the wood from moisture and gives it a nice finish. If you wear gloves, you can prevent oily hands. 
  7. Rub the oil-soaked cloth onto the shovel handle, making sure to cover the entire surface evenly. Apply a thin, even coat of oil, allowing it to soak into the wood. You can use a brush for this job if you prefer.
  8. Let the oil penetrate the wood for about 15-20 minutes. This allows the oil to absorb into the wood fibres and nourish the handle.
  9. After the waiting period, use a clean cloth or rag to wipe off any excess oil. This prevents any oil that hasn't soaked into the wood from becoming sticky and attracting dust.
  10. Safety note: never leave linseed oil-soaked rags scrunched up, they are a fire risk. When linseed oil dries, it generates heat, so rags can spontaneously combust. Spread oily rags out flat on a concrete surface, in a safe place and make certain they dry out completely before binning them.
  11. Allow the handle to dry completely before using the shovel. This can take a few hours or overnight, depending on the temperature.
  12. You can repeat the oiling process from time to time to maintain the handle's condition.

By regularly sanding and oiling your tool handles, you can make them last much longer.

Sharpening mower blades

Dull mower blades tear and rip the grass – if you look at the ends of mown grass leaves, you’ll notice little strings of fibre on the cut end where it's frayed and damaged. That’s a signal you’re overdue for sharpening your blades! A sharp blade makes a cleaner cut and causes less stress to the grass; helping it recover faster. To sharpen a lawn mower blade, follow these steps:

  1. Safety first: Before you start, disconnect the spark plug wire from the spark plug to prevent accidental starting. If you have an electric mower, remove the battery. This ensures your safety while working on the mower blade.
  2. Remove the blade: Turn the mower on its side or lift it onto a sturdy work surface. Locate the nut or bolt holding the blade in place. Use a spanner or socket wrench to remove the fastener. Carefully remove the blade from the mower deck.
  3. Clean the blade: Inspect the blade for areas of damage or excessive wear. Use a wire brush or a scraper to remove any built-up grass, dirt, or debris. Cleaning the blade allows you to see what’s going on and make a good job.
  4. Clamp the blade: To sharpen the blade, it’s best to secure it in a vice or with a clamp. Make sure the blade doesn’t move while you work on it.
  5. Sharpen the blade: Use a metal file (or a bench grinder) to sharpen the blade. Follow the original angle of the cutting edge and file or grind the blade in smooth, even strokes. Maintain the same angle along the entire length of the cutting edge to ensure a consistent sharpness.
  6. If using a metal file: Hold the file at the same angle as the bevelled cutting edge, filing from the back of the blade towards the front cutting edge. Push the file along the cutting surface in one direction only, away from your body. Repeat this process until the cutting edge is sharp. Take your time and be consistent with your strokes.
  7. If using a bench grinder: Apply the blade to the grinder wheel, maintaining the original bevel angle. Move the blade steadily across the wheel, ensuring even sharpening along the length of the cutting edge. Be careful not to overheat the blade during grinding, or you’ll permanently affect its hardness and it will go blunt really fast. If you see the metal changing colour to bluish-black, it’s overheating. You can mitigate this by letting the blade cool between passes, or keeping a jar of water beside the grinder and periodically dipping the blade into it to cool.
  8. Check for balance: After sharpening the blade, hang the blade on a screwdriver pushed through the centre hole. If one side wants to be lower than the other, it may be out of balance. To correct it, carefully remove metal from the heavier end of the blade using a file or grinder. Repeat the check until the blade balances.
  9. Reinstall the blade: Align the blade properly with the mounting hole in the mower deck. Secure it in place with the nut or bolt.
  10. Get the mower ready to run: Double-check that the blade is securely fastened, then reconnect the spark plug lead, or replace the battery.

Now your lawn mower blade will cut cleanly, without tearing or ripping your grass.


Related products

Yates Garden Sprayer (5 Litre)

Suitable for use with all water soluble home garden concentrates (including spraying for weeds, pests and, diseases in both your garden and lawn).

More project guides & articles

Sustainable Gardening

Gardening is a great way of living sustainably. Here are some more ideas on how you can garden sustainably.