


Yates Dynamic Lifter Organic Plant Food
Releases nutrients slowly, improves the structure and moisture retention of the soil and encourages earthworms and beneficial soil micro-organisms.
Create a Yates account today!
Sign up to join the Yates Garden Club for monthly e-mails packed with seasonal inspiration, tips for success & exclusive promotions.
Plus if you’re a Garden Club member you can take part in the Yates Growing Community - a blog to share successes, get advice & win prizes in fun challenges along the way!
Enter the email address associated with your account, and we'll email you a new password.
We sometimes hear crop rotation dismissed as an ‘old-school’ gardening technique. That’s a fair statement, if you consider the practise of crop rotation has literally thousands of years of experience behind it!
Crop rotation isn’t widely practiced these days, but we vote to restore it; rotation can deliver real benefits (if you’re an organic gardener, read on).
First of all, we need to define what crop rotation is. It’s pretty straightforward…it boils down to grouping similar plants together (root crops, for example) and then switching their location around after every season. That way you're not planting the same crop in the same spot year after year.
• Allows garden soil to recover better, more than with successive identical crops
• Reduces soil-borne disease risk (e.g. clubroot)
• Improves soil fertility year-on-year, minimising need for fertilisers in soil preparation
• Rotating deeper rooted (like carrots) and shallow rooted (e.g. salad greens) vegies improves soil structure over time
• Reduces damage from some soil insect pests, e.g. nematodes or springtails
If you aren’t familiar with seasonal shuffling in your vegie garden, it’s no surprise. The way 21st Century gardening has developed (with smaller gardens, raised beds and more sophisticated fertilisers) gives gardeners more margin for error, so crop rotation isn’t considered as critical these days.
However, we think that even if the gains are less noticeable, it’s still worth doing. And there are situations where rotation does make an appreciable difference. Organic gardening is the obvious example: without the boost of synthetic fertilisers, time-honoured nutritional methods still deliver results.
There are all sorts of different versions in circulation, so we’re going to present a simplified 3-year rotation method. The model for this is the famous “Dig for Victory” home garden campaign from World War II, which we’ve adapted for contemporary gardens.
Vegies can be roughly classified into 3 groups of plants with different nutritional needs. If you divide your garden into 3 segments, it’s easy to circulate these groups of vegies around every season to a new spot.
And if you grow them in the right order, the old crop will help prepare the soil for the new crop. For example, if you have brassicas planted, they will deplete nitrogen from the soil. After you harvest your brassicas, you can plant root vegies in that spot. Root crops don’t like excess nitrogen, so the depleted soil is exactly the way they prefer it.
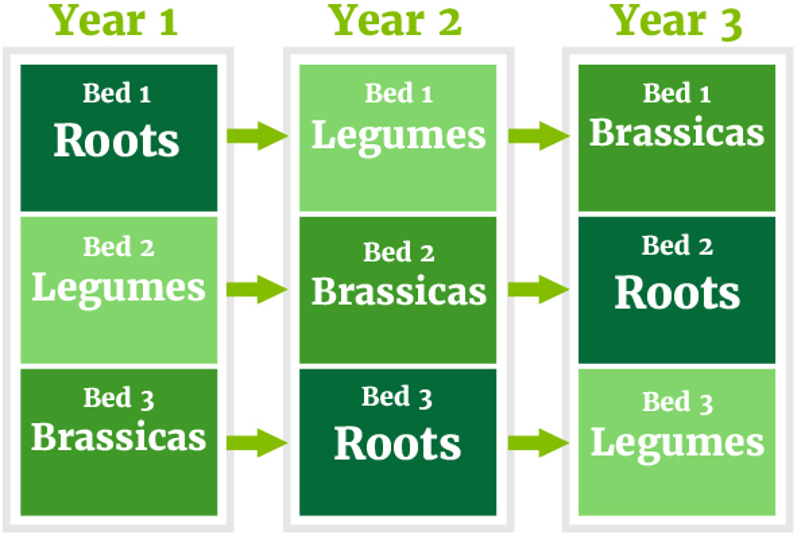
Simple 3 bed crop rotation plan
The different vegetable groups (in order of succession) are:

Includes peas, beans and broad beans; they make their own nitrogen (N), so they don’t need much extra. They also really appreciate added phosphorus (P) and potassium (K).
The legume ‘friends’ include lettuce, tomatoes, capsicums, spinach, sweetcorn, silverbeet, spring onions, onions, garlic, leeks and celery. Legume friends prefer plenty of nitrogen in their fertiliser, plus generous amounts of compost and organic matter before planting.

This group includes cabbage, bok choy, broccoli, cauliflower, radish, kohl rabi and Brussels sprouts. They’re heavy feeders that like plenty of nitrogen in their fertiliser, plus generous amounts of compost and organic matter before planting.

This group includes carrots, parsnips, turnips and swedes. These guys don’t like too much nitrogen but benefit from additional phosphorus and potassium fertiliser. In fact, if you’re too generous with nitrogen it can make them grow mis-shaped and forked; you can get away without adding nitrogen at all if you’re following on from a brassica crop.
The root group also includes tubers and rhizomes like potato, kūmara, ginger, yams (oca) and turmeric. Tubers and rhizomes like to be fed with a balanced fertiliser, containing all of the NPK macronutrients (don’t overdo the nitrogen though, they may end up putting all their energy into growing leaves, not juicy tubers). Note that beetroot prefers to be treated like this second group, as it’s slightly more tolerant of nitrogen than the ‘proper’ roots.

During wartime, manure was hard to get, so the “Dig for Victory” solution was to feed only the Legumes section each year. Over the course of the three-year rotation, nitrogen inputs would work their way around the whole garden. Luckily, fertilisers aren’t in short supply these days, so you can be a bit more generous with feeding!
There are different crop rotation schemes that call for a four-year cycle, or even up to seven rotations. We think this is overkill and way too complex to be practical. It’s easy to over-complicate things, so remember the big picture: the key takeaway is simply to move your vegies each year. It’s only a guideline, not a rule.
Another reason to keep it simple is that there are all sorts of anomalies; for example, radishes, which you'd expect to be in the Root group, actually go with the Brassicas.
After you’ve divided up the garden into three beds and decided what crop is going into each bed, you can make a planting map, so you can refer to it next season. We find it easiest to just snap a photo on your phone when everything is planted out. Having a record makes it really simple to stick to the plan next year.
Crop rotation is about maintaining healthy soil and you can complement it by mulching with compost and choosing fertilisers that nourish the soil ecosystem. Remember you want your soil to be teeming with microbes, as they help break down nutrients to keep your vegies well-nourished and thriving. So when you're sowing or planting in your vegie patch, feed the soil community with some generous handfuls of Yates Dynamic Lifter fertiliser. Your microbes will love you!
Aged animal manure, leaf mould, spent mushroom compost, garden compost and green manure crops are all excellent additives when dug into the soil. Yates Nature’s Way Organic Compost is a great option, or you can make your own compost.
All organic materials will eventually decompose in soil, so they need to be renewed from time to time, especially in constantly cultivated annual flower and vegetable beds.
Heavy clay soils benefit from organic matter too, because it improves their structure by binding fine clay particles into crumbs; this allows better air and water movement. By adding coarse sand to heavy soil, you can make a permanent improvement in soil texture. Spread the sand to a depth of 5–8cm, then mix well into the topsoil to a depth of 15–20cm.
Gypsum can be incorporated into clay soil and in most cases, will help the soil to function more effectively. Add gypsum at a rate of about 0.5–1kg per square metre of soil. Beware though, the crumb structure of clay and clay loam collapses and compacts if they’re dug when too wet. Allow the soil to dry out for a day or two before digging to avoid damage. When cultivating any soil, only dig the topsoil. Don’t dig deep enough to bring subsoil (especially clay) to the surface.
You’ll get better results if you concentrate on generously enriching the soil in one particular area, expanding the area as materials and time allow. A wide range of organic soil improvement products are available through nurseries. The following options are all ideal soil amendments:


Share
Share this article on social media